
Using boot2docker to run Docker on a Mac or Windows
Docker's underlying containerization technology only works on Linux. To use it on a Mac or Windows, you must use a command-line tool called boot2docker that installs a Linux virtual machine (or "VM") on your system. If you're unfamiliar with VMs, they let you run a "guest" operating system (like Linux) on your "host" operating system (like a Mac or Windows). For all intents and purposes, the VM is another computer running "inside" your computer -- it has its own operating system, filesystem, and network that can piggyback on the resources of the host OS in an isolated environment.
So, the idea behind boot2docker is really quite clever: since we can't run Docker natively on Windows or a Mac, we install a bare-bones Linux VM that can run Docker, and then we communicate with it using a Docker client running on our host (i.e., the terminal on our main OS). If you've ever used a package like Postgres or MySql, it's exactly the same idea: you have a client tool that you use to issue commands to another server. The main difference is that our "docker" process is running inside a VM, rather than as a native service.
This chapter will walk you through the installation process. Since both Docker and boot2docker are changing so rapidly, rather than describe the detailed steps here, I've provided an overview of the process so that you'll understand what's happening.
Install boot2docker
Before you start, it's a good idea to first set up SSH on your host machine so that boot2docker can install your login credentials on the VM. Otherwise, you'll be prompted for a password whenever you log in. If you're unfamiliar with SSH or SSH keys, Appendix ??? will give you details of how to get set up.
First, download the installation package for your system. You can find Mac and Windows installation instructions on the Docker's documentation site. Next, you run the install procedure, which will install the boot2docker command line tool as well VirtualBox, a free tool from Oracle that allows your computer to run virtual machines.
Once the basic tools are installed, you're ready to create the box by running boot2docker init. (Think of this as purchasing a new computer.) This will create a new Linux "box" called "boot2docker-vm" on your machine that has Docker installed, as well as configure some of the basic things you'll need to communicate with it from your host. The command will produce something like this:
$ boot2docker init
2014/08/11 13:30:58 Creating VM boot2docker-vm...
2014/08/11 13:30:58 Apply interim patch to VM boot2docker-vm (https://www.virtualbox.org/ticket/12748)
2014/08/11 13:30:58 Setting NIC #1 to use NAT network...
2014/08/11 13:30:58 Port forwarding [ssh] tcp://127.0.0.1:2022 --> :22
2014/08/11 13:30:58 Port forwarding [docker] tcp://127.0.0.1:2375 --> :2375
2014/08/11 13:30:58 Setting NIC #2 to use host-only network "vboxnet4"...
2014/08/11 13:30:59 Setting VM storage...
2014/08/11 13:31:07 Done. Type `boot2docker up` to start the VM.
Once the box is created (it can take a few minutes because it has to download the image), you run boot2docker up to boot up the box. Think of this as turning your the new computer on. The box will start the Docker daemon in the VM that listens for requests from the our client on our host. Here's an example:
$ boot2docker up
2014/08/11 13:38:00 Waiting for VM to be started...
............
2014/08/11 13:38:36 Started.
2014/08/11 13:38:36 To connect the Docker client to the Docker daemon, please set:
2014/08/11 13:38:36     export DOCKER_HOST=tcp://192.168.59.104:2375
Finally, you'll need to set an environment variable called DOCKER_HOST that will tell your Docker client on your host machine the URI for the Docker daemon running on the VM. This address is the last line returned from the "boot2docker up" command. For example, here's what we'd run based on the output we got in the previous step:
$ export DOCKER_HOST=tcp://192.168.59.104:2375Since running the export command in the shell will only set the environment variable temporarily, you should follow the process on your OS to make it permanent. On a Mac, add the following line to the ~/.bash_profile:
export DOCKER_HOST=tcp://$(boot2docker ip 2>/dev/null):2375On windows, use the "environment variables" setting of the "Advanced system settings" tab
Once you've completed all these steps, you should have the Docker client installed and a VM capable of starting Docker containers. To test it out, try the command "docker run hello-world" from your host:
$ docker run hello-world
Unable to find image 'hello-world' locally
Pulling repository hello-world
565a9d68a73f: Pulling image (latest) from hello-world, endpoint: https://cdn-reg565a9d68a73f: Download complete
511136ea3c5a: Download complete
2505d942a91d: Download complete
Hello from Docker.
...
As you can see from the output, this command has pulled down the hello-world repository from (more on this in a later chapter) and printed the text "Hello from Docker." If you're seeing this message, then you've successfully installed boot2docker. Alternatively, if you get a message like the following, you should doublecheck that you've set the DOCKER_HOST environment variable correctly:
$ docker run hello-world
2014/08/11 15:05:55 Post http:///var/run/docker.sock/v1.13/containers/create: dial unix /var/run/docker.sock: no such file or directory
Upgrading from an older install
If you've installed an older version of boot2docker, you can (and should!) use boot2docker itself to update the package. The commands are:
$ boot2docker stop
$ boot2docker download
$ boot2docker start
boot2docker Quick Reference
boot2docker uses the increasingly common "git"-style format:
$ boot2docker [<options>] <command> [<args>]For example, here's how to get the VM's current status:
$ boot2docker status
running
The following table, taken from "boot2docker help", summarizes the various commands.
| Command | Description |
|---|---|
| init | Create a new boot2docker VM. You should only do this once to create a box. |
| up | Starts the VM and the Docker daemon |
| status | Get the current state of VM, such as "running," "saved," or "poweroff". |
| ssh [ssh-command] | Start a shell on the VM using SSH. If you have not set up an SSH key, you'll be prompted for a password. (It's "tcuser") |
| save / suspend | Suspend the VM and save state to disk. |
| down / stop / halt | Gracefully shutdown the VM. |
| restart | Gracefully reboot the VM. |
| delete / destroy | Delete the boot2docker VM and its disk image. |
| config / cfg | Displays selected settings for the VM, such as its memory size or IP address |
| help | Displays the commands in this table |
| info | A json dump of profile settings |
| ip | The IP address of the VM's Host-only network; this can be used to set the DOCKER_HOST environment variable |
| download | Download's the current boot2docker ISO image. (An ISO is an archive format based on old CDROM standard.) |
| upgrade | Upgrade the boot2docker ISO image (if vm is running it will be stopped and started). |
| version | Display the current version of boot2docker. It changes often, so be sure to update frequently! |
You can also provide a variety of options to further customize the VM, such as setting the amount of memory or the name of the box itself. Most of these options appear to only work when the image is created (i.e., they only apply then you're doing "boos2docker init"). The following table summarizes the options from "boot2docker help". (The actual output from the command shows the default settings for each option.)
| Option | Description |
|---|---|
| --basevmdk | Path to VMDK to use as base for persistent partition |
| --dhcp | enable VirtualBox host-only network DHCP. |
| --dhcpip | VirtualBox host-only network DHCP server address. |
| --disksize | boot2docker disk image size (in MB). |
| --dockerport | host Docker port (forward to port 2375 in VM). |
| --hostip | VirtualBox host-only network IP address. |
| --iso | path to boot2docker ISO image. |
| --lowerip | VirtualBox host-only network DHCP lower bound. |
| --memory | virtual machine memory size (in MB). |
| --netmask | VirtualBox host-only network mask. |
| --serial | try serial console to get IP address (experimental) |
| --serialfile | path to the serial socket/pipe. |
| --ssh | path to SSH client utility. |
| --ssh-keygen | path to ssh-keygen utility. |
| --sshkey | path to SSH key to use. |
| --sshport | host SSH port (forward to port 22 in VM). |
| --upperip | VirtualBox host-only network DHCP upper bound. |
| --vbm | path to VirtualBox management utility. |
| --verbose | display verbose command invocations. |
| --vm | virtual machine name. |
Here's an example of how you'd created an image that used 4GB, rather than the default 2GB.
$ boot2docker --memory=4096 init
2014/08/11 17:15:50 Creating VM boot2docker-vm...
2014/08/11 17:15:50 Apply interim patch to VM boot2docker-vm (https://www.virtualbox.org/ticket/12748)
2014/08/11 17:15:50 Setting NIC #1 to use NAT network...
2014/08/11 17:15:51 Port forwarding [ssh] tcp://127.0.0.1:2022 --> :22
2014/08/11 17:15:51 Port forwarding [docker] tcp://127.0.0.1:2375 --> :2375
2014/08/11 17:15:51 Setting NIC #2 to use host-only network "vboxnet4"...
2014/08/11 17:15:51 Setting VM storage...
2014/08/11 17:15:59 Done. Type `boot2docker up` to start the VM.

$ boot2docker info | python -m json.tool
{
    "BaseFolder": "/Users/odewahn/VirtualBox/VMs/boot2docker-vm",
    "BootOrder": null,
    "CPUs": 4,
    "CfgFile": "/Users/odewahn/VirtualBox/VMs/boot2docker-vm/boot2docker-vm.vbox",
    "DockerPort": 2375,
    "Flag": 0,
    "Memory": 4096,
    "Name": "boot2docker-vm",
    "OSType": "",
    "SSHPort": 2022,
    "SerialFile": "/Users/odewahn/.boot2docker/boot2docker-vm.sock",
    "State": "poweroff",
    "UUID": "db24beb1-5b83-4744-9f5f-ce05b41eda91",
    "VRAM": 8
}
Opening a port with VirtualBox
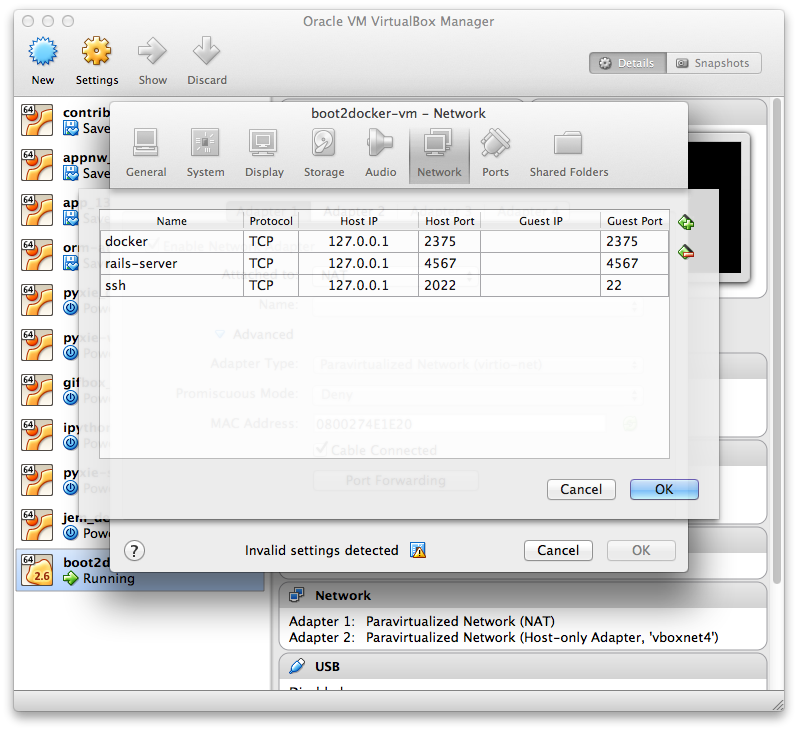
By and large, boot2docker hides the nitty gritty details of working directly with VirtualBox, the underlying software that allows us to run the VMs. However, there's one particular situation -- opening a port from your VM to your host machine -- where you'll need to use the VirtualBox itself. The most common use case for doing this is when you are developing some custom app that is running within Docker, but you want to connect with it in your browser.
For example, say you're writing a Rails application. You might pull down the a Docker image that has a Ruby and Rails environment installed, start the local development server, and then try to connect to localhost:4567 to see the output, like you would in a "normal" environment. By default, however, boot2docker only exposes a few ports on the VM (port 2022 for SSH and port 2375 for the boot2docker API), so instead of seeing your app, you'll only see a "Cannot connect" page.
Fortunately, the fix for this is quite simple. VirtualBox has a command line utility called "VBoxManage" that you can use to customize the box as it runs. To expose a port, type something like this into your terminal:
$ VBoxManage controlvm boot2docker-vm natpf1 "rails-server,tcp,127.0.0.1,4567,,4567"This will create a port forwarding rule that in VirtualBox that will last until you destroy the box. You can also create this rule in the VirtualBox GUI tool in the "Settings -> Network -> Port Forwarding" screen, as shows in the next figure.
You can find out more about this tool in the extensive VirtualBox documentation site.